Containers
This document describes containerization best practices throughout the full lifecycle of a containerized workload:
- Docker image design guidelines
- Security best practices
- CI/CD pipelines
- Observability
- Operations and maintenance
Definitions
Basic definitions and vocabulary regarding containerization technology.
| Term | Description |
|---|---|
| Container | A container is the runtime instantiation of a Container Image. A container is a standard Linux process often isolated further through the use of cgroups and namespaces. |
| Container Image | A container image, in its simplest definition, is a file which is pulled down from a Registry Server and used locally as a mount point when starting Containers. |
| Container Host | The container host is the system that runs the containerized processes, often simply called containers. |
| Container Engine | A container engine is a piece of software that accepts user requests, including command line options, pulls images, and from the end user's perspective runs the container. There are many container engines, including docker, RKT, CRI-O, and LXD. |
| Images Registry | A registry server is essentially a fancy file server that is used to store docker repositories. Typically, the registry server is specified as a normal DNS name and optionally a port number to connect to |
Overview
This documentation assumes basic knowledge of Docker and Docker CLI. To learn or refresh on container related concepts, please refer to the official documentation:
[!INFO] Mirantis acquired Docker Enterprise in November 2019
Basic Concepts
Docker CLI syntax
Docker CLI has following syntax:
Syntax: docker <docker-object> <sub-command> <-options> <arguments/commands>
Example: docker container run -it ubuntu
Docker Components
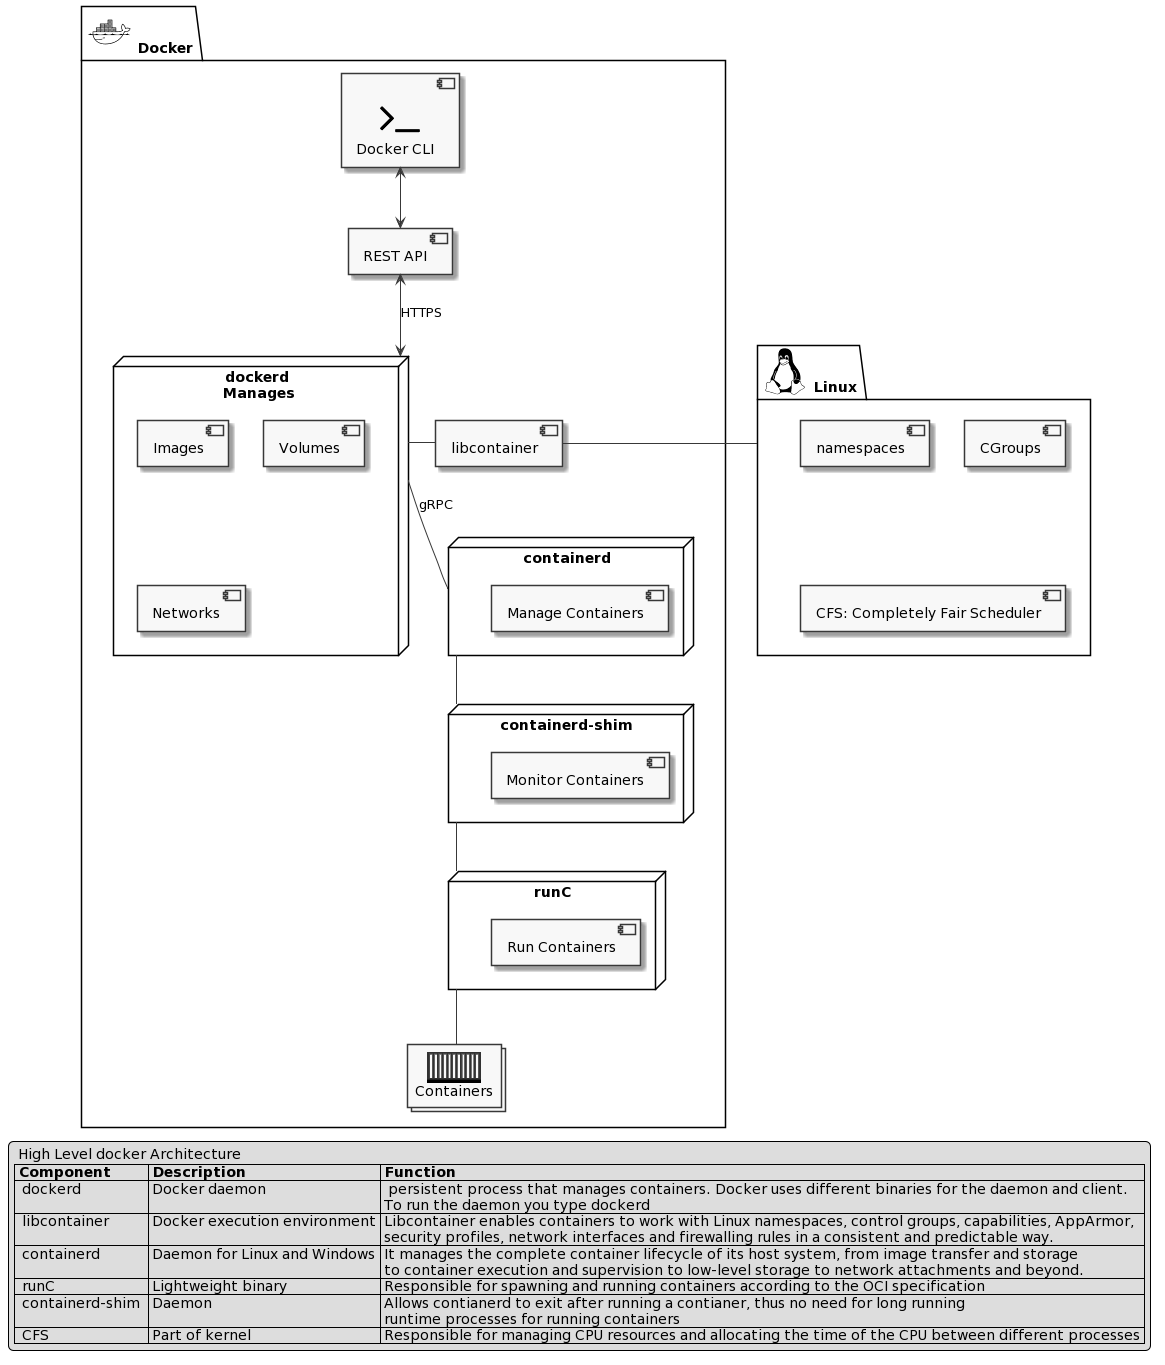
Sources:
Container Layer
By default all docker image layers are immutable (read-only). When container is created using docker run command, an additional mutable (read-write) layer is created. This layer is only there for the duration of container lifetime and will be removed once container exits. When modifying any files in a running container, docker creates a copy of the file and moves it to container layer (COPY-ON-WRITE) before changes are saved. Original files as part of the image are never changed.
Access remote Docker host from CLI
On machine form where you want to access docker host, setup variable:
export DOCKER_HOST="tcp://<docker-host-ip>:2375"
[!NOTE] Docker default ports:
2375 - unencrypted traffic
2376 - encrypted traffic.
[!WARNING] IMPORTANT: This setting is only for testing/playground purposes. It will make docker host available on the network and by default there is no authentication.
Use docker CLI as non root user
- Create Docker group:
sudo groupadd docker - Create a non-root user you want to use with docker:
sudo useradd -G docker <user-name> - Change this user primary group:
sudo usermod -aG docker <non-root user> - Logoff and login with the docker user.
- Optional - restart docker service:
sudo systemctl restart docker
Container Lifecycle
This document covers best practices and DOs & DONTs for whole lifecycle of containerized workloads.
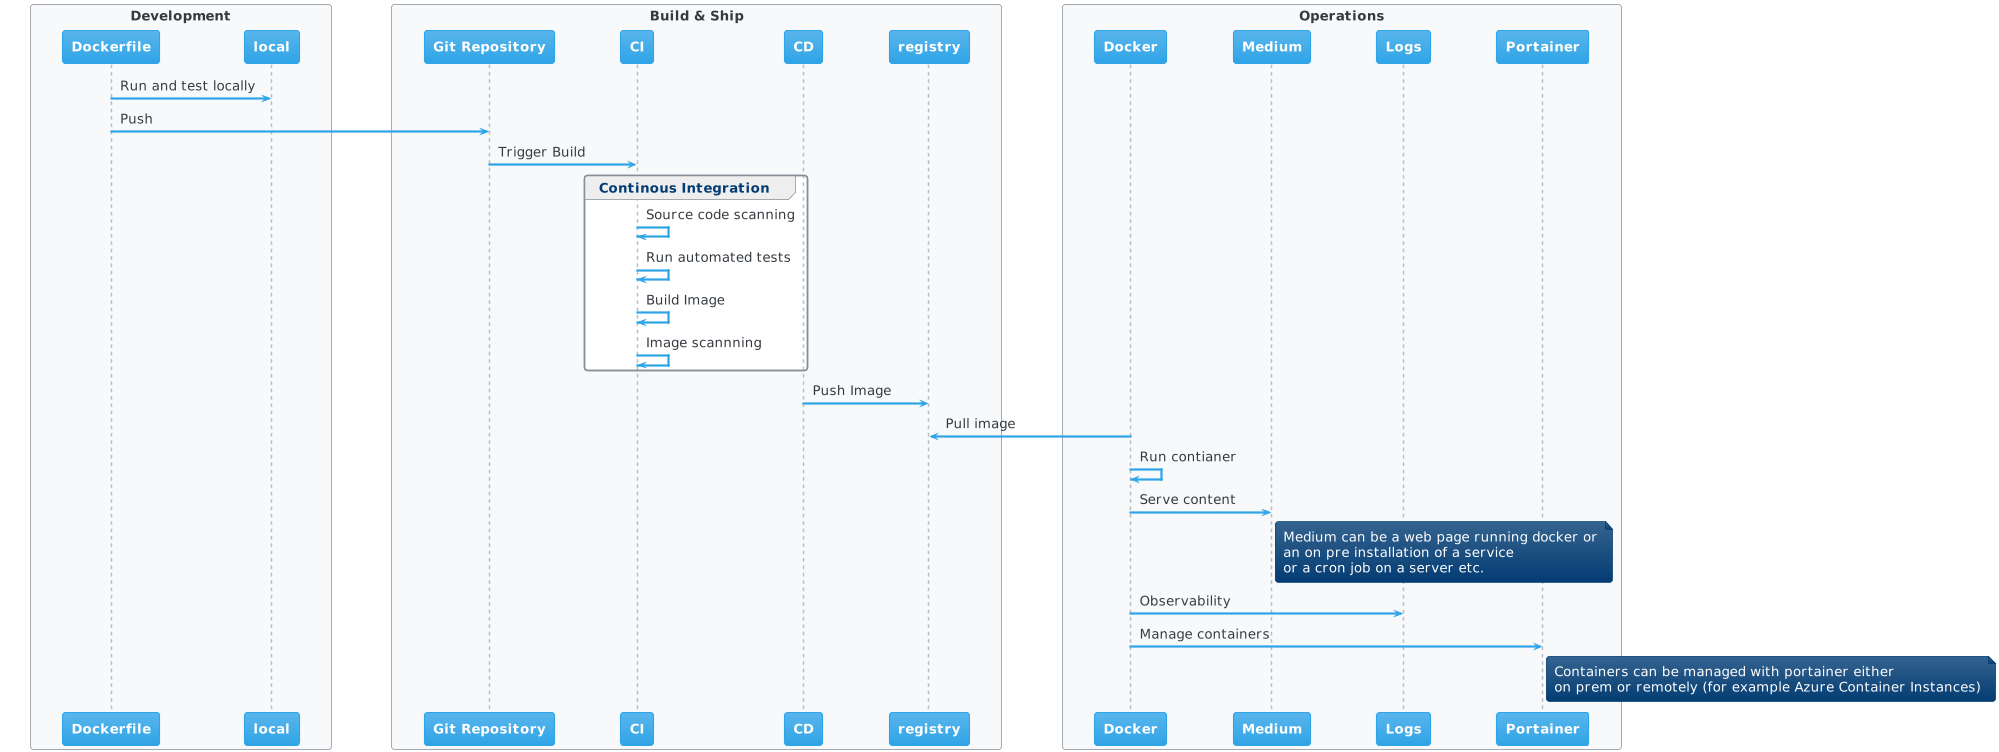
| Stage | Area | Description |
|---|---|---|
| Dockerfile design | Development | How to design Dockerfiles with performance and security in mind |
| Building Images | Build & Ship | Best practices around building docker images locally and remotely |
| Testing & Scanning | Build & Ship | Use of static code/image analyzers to test and scan images and containers |
| Storing images | Build & Ship | Working with private image repositories |
| Delivering images | Build & Ship | Supply chain and images delivery to destination host |
| Running Containers | Operations | Running containers in production |
| Monitoring Containers | Operations | Monitoring and observability |
| Managing Containers | Operations | Administration, updates, upgrades |
Development
Docker image is an immutable blueprint based on which containers are created.
It is highly recommended to use VS Code with a Docker plugin for developing with containers.
[!TIP] here is a good write up about hot to setup and use Docker extension with VS Code
Quickly create Dockerfile stub
If you are using VS Code with a Docker extension, you can quickly create a Dockerfile stub for your project.
- open folder with your project in VS Code
- go to command palette Ctrl+Shift+P and type
Docker: Add Docker Files to Workspace - select your language from the dropdown box and answer a few questions
- your Dockerfile will be generated in the directory you are currently in
- make sure to tweak the file, but the templates are pretty good already
How to debug image building process
To build an image you can use a docker CLI docker build --progress=plain -t imagename:tag -f Dockerfile . or use VS Code Docker extension to do the same
[!NOTE] the
--progress=plainflag creates verbose output to stdout and is enabled by default when using Docker extension.
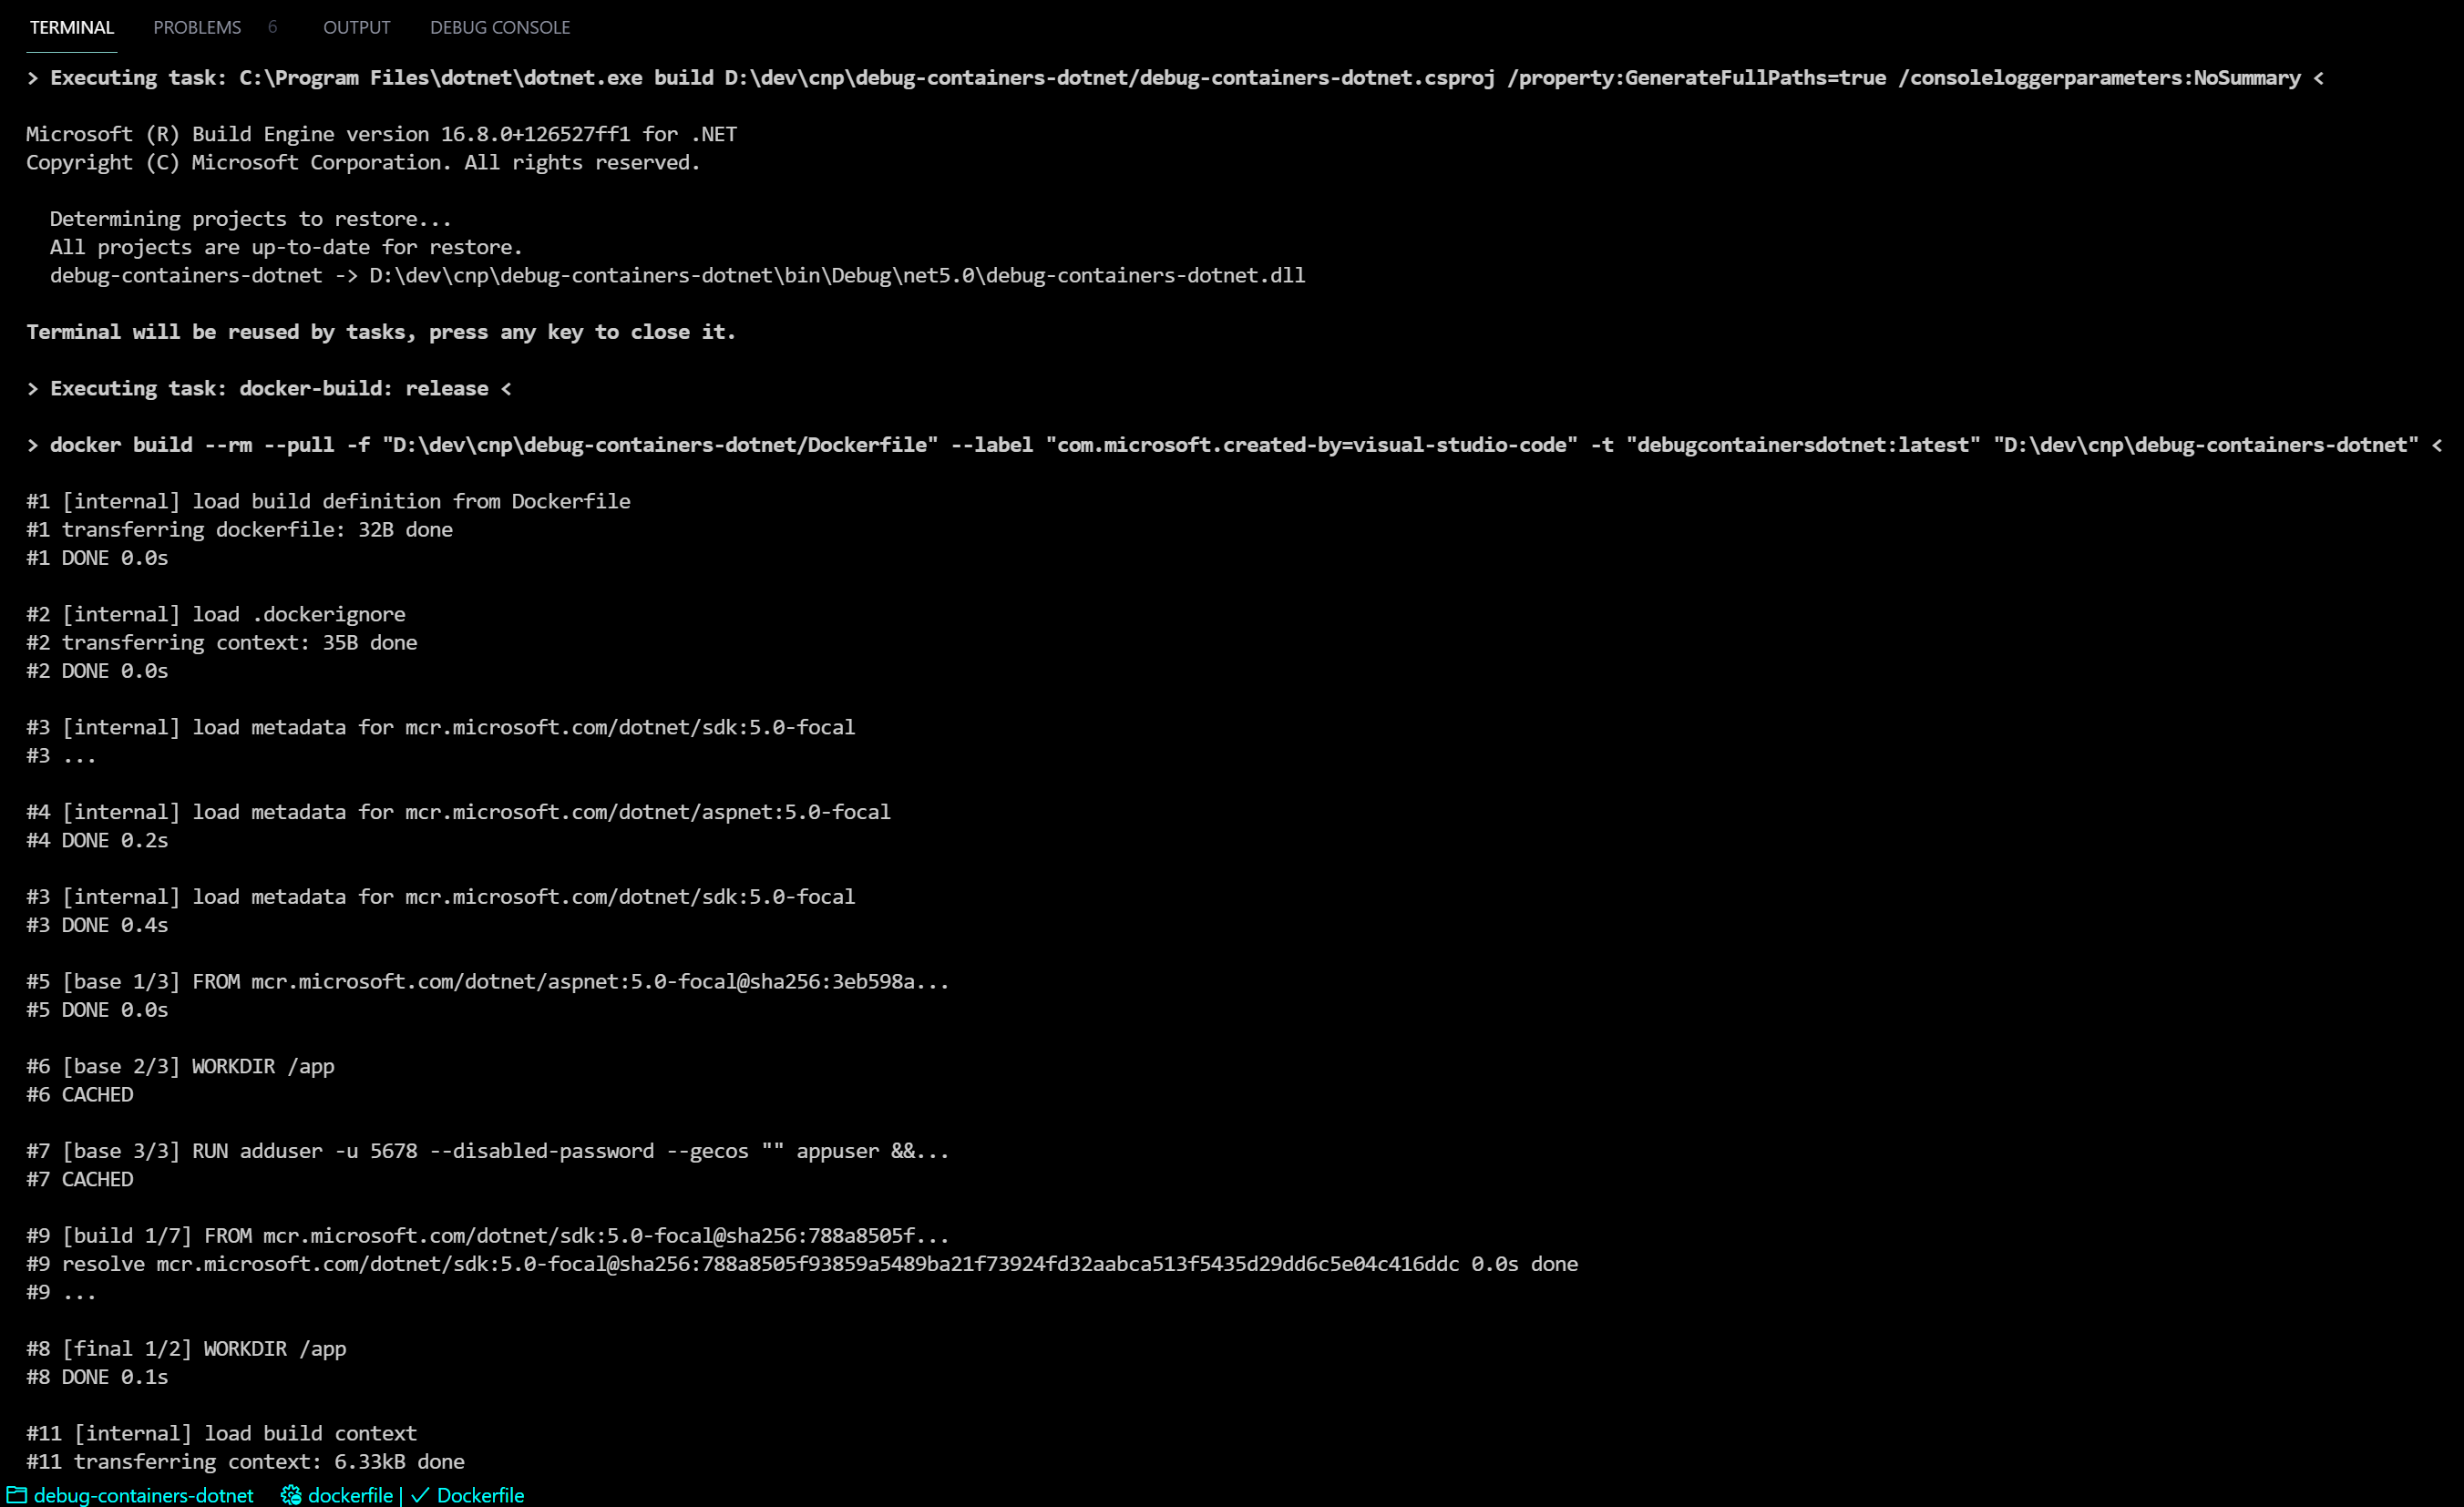
When creating a Dockerfile, each new command such as RUN, ADD, COPY etc creates a new intermediate container that you can exec into and debug.
[!ATTENTION] The debugging steps differ if docker host supports new build mechanism with
buildkit(from version 1.18 onwards) or old build mechanism with docker build. Buildkit debugging is relatively complex, so it is easier to drop to the docker build way usingDOCKER_BUILDKIT=0before running docker build command. This setting will temporary switch build to legacy one.
Steps to debug Dockefile build process using legacy build
- clone or create a new one with Dockerfile that contains error
- run legacy build command
DOCKER_BUILDKIT=0 docker build --rm=false -t wrongimage -f Dockerfile.bad . - this Dockefile produces an error, the folder is missing
Step 17/19 : WORKDIR /app
 ---> Running in 21b793c569f4
 ---> 0d5d0c9d52a3
Step 18/19 : COPY --from=publish /app/publish1 .
COPY failed: stat app/publish1: file does not exist
- note that right above the error there is a message with intermediate image ID of 0d5d0c9d52a3
- since we used flag
--rm=falseintermediate images are not removed and we can list them usingdocker image ls - let's start a new container from this image in an interactive mode
docker run -it 0d5d0c9d52a3 sh - inside of the container we can see that the required folder is not created
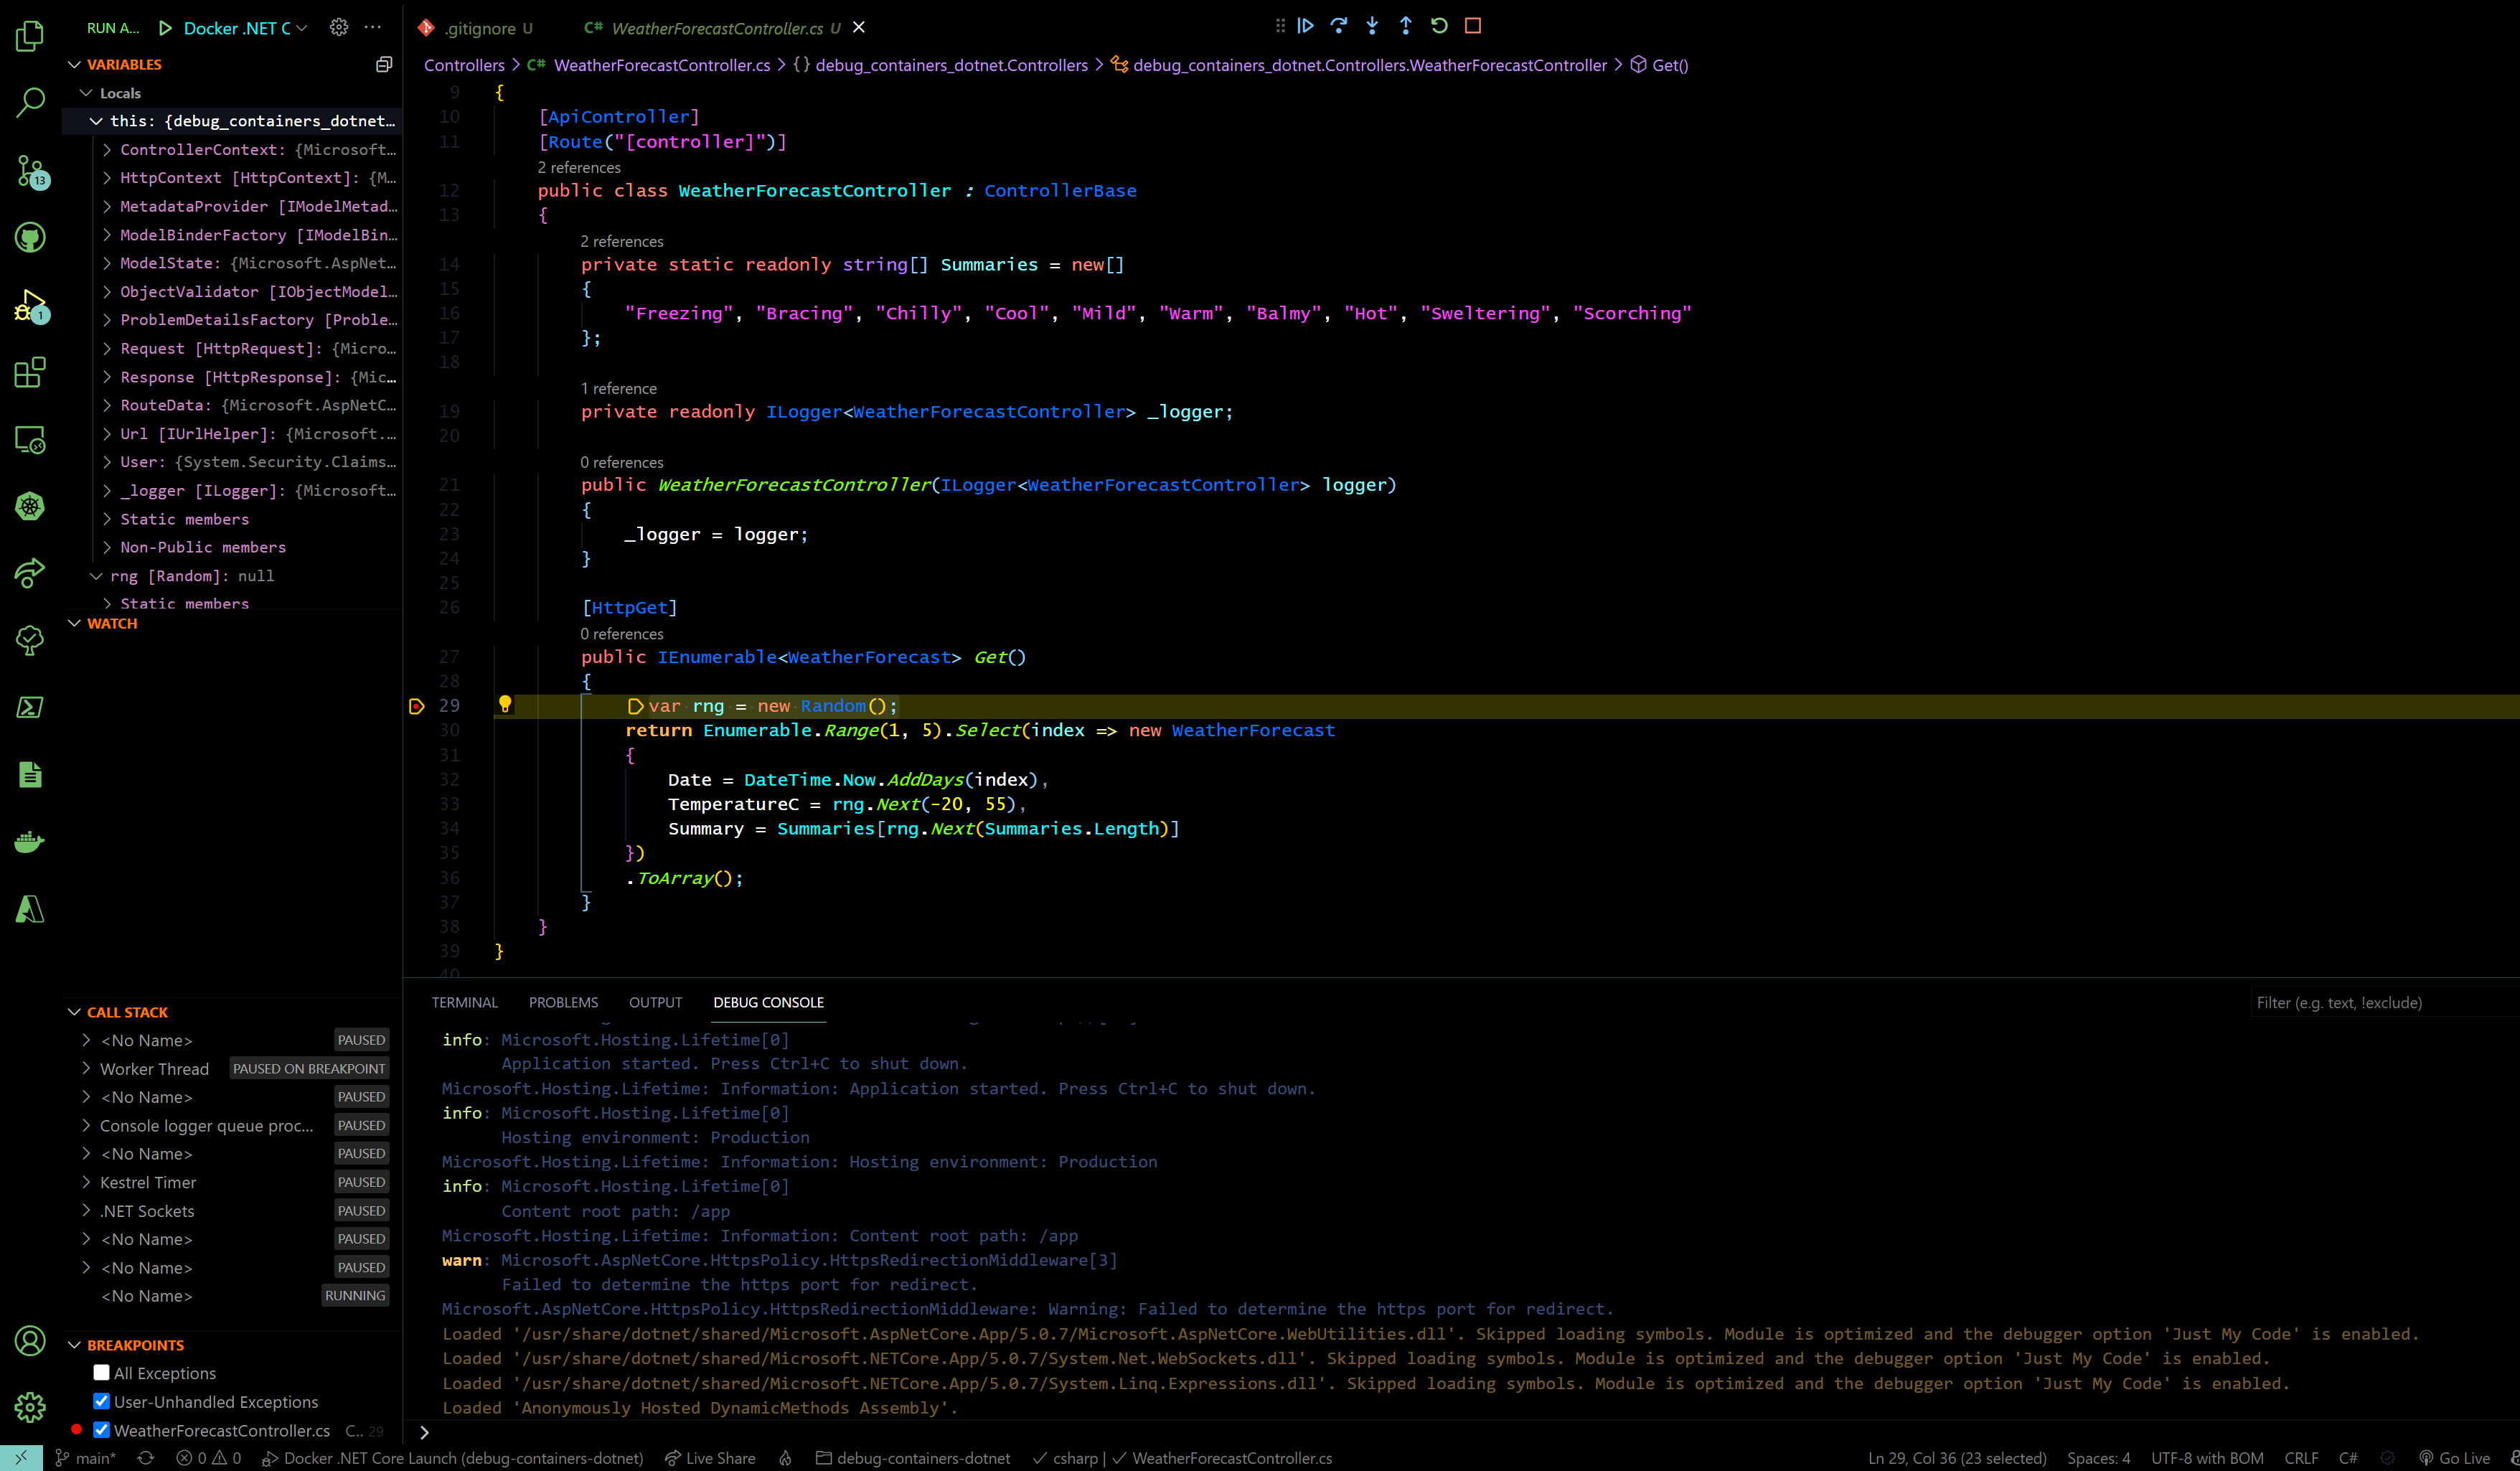
How to debug applications running in containers
Applications running in containers can be directly debugged from an IDE when a launch.json file is present and contains instructions how to launch and debug a docker container.
[!TIP] it is strongly recommended to use VS Code with a Docker extension to easily add Dockerfile and debugging settings to the project.
- Click here to see an already setup sample ASP.NET Core WebAPI project
- Clone the project
cdinto project directorycode .to open VS Code- select
docker: initialize for debuggingand follow the wizard - switch to
Run and Debugview Ctrl+Shift+D - Select
Docker .NET Launch - set breakpoint in the controller
Use Multistage builds
In a multistage build, you create an intermediate container – or stage – with all the required tools to compile or produce your final artifacts (i.e., the final executable). Then, you copy only the resulting artifacts to the final image, without additional development dependencies, temporary build files, etc.
A well crafted multistage build includes only the minimal required binaries and dependencies in the final image, and not build tools or intermediate files. This reduces the attack surface, decreasing vulnerabilities.
It is safer, and it also reduces image size.
Consider below Dockerfile building a go API. The use of multistage build is explained in file comments. Try it yourself!
# Stage 1 - build phase
# Build binaries of your go app

# Use image containing golang distribution as base image
FROM golang:1.16 as builder

# Copy all files excluding the ones specified in .dockerignore
COPY ./main.go ./

# Build our app
RUN go build -o /go-app ./main.go

# Output content of the folder for readability
RUN ls

# Stage 2 - packaging phase
# We don't need all the packages and dependencies from previous image
# They would make our image big and create larger attack surface
# Using distroless image ensures good performance and security
FROM gcr.io/distroless/base

# This command tells docker to expose port 8080 in the running container
EXPOSE 8080

# Finally we are copying the binaries from previous image and executing the app
COPY --from=builder /go-app /.
ENTRYPOINT ["./go-app"]
Use Distroless images
Use the minimal required base container to follow Dockerfile best practices.
Ideally, we would create containers from scratch, but only binaries that are 100% static will work.
Distroless are a nice alternative. These are designed to contain only the minimal set of libraries required to run Go, Python, or other frameworks.
Use docker-slim to ensure that your image is as lean as possible
Container images should be small and contain only components/packages absolutely necessary for the containerized workload to work correctly. This is important for two main reasons:
- security: making images smaller by removing unnecessary packages greatly reduces attack surface
- performance: smaller images start much faster
[!INFO] docker-slim comes with many options. It supports slimming down images, scanning Dockerfiles etc. The best way to start with it is to follow steps in demo setup.
Confidential information
Use .dockerignore to exclude unnecessary files from building in the container. They might contain confidential information.
Docker uses biuikdkit by default for building images. One of buildkit features is ability to mount secrets into docker image using RUN --mount=type=secret. This is for the scenario where you need to use secrets during image build process, for example pulling credentials from git etc.
Here is an example how to retrieve and use a secret:
-
create a secret file or environmental variable:
export SUPERSECRET=secret -
inside a Dockerfile add
RUN --mount=type=secret,id=supersecret, this will make the secret available inside the image under/run/secrets/supersecret -
build the image with your secret like so:
export DOCKER_BUILDKIT=1
docker build --secret id=supersecret,env=SUPERSECRET .
this will safely add from the environmental variable SUPERSECRET into the container. Examining image history or decomposing layers will not reveal the secret.
Use multiple Dockerfiles
Consider creating separate Dockerfiles for different purposes. For example you can have a dedicated docker file with testing and scanning tooling preinstalled and run it during local development phase.
[!TIP] Remeber, you can build imaged from multiple docker files by passing
-fflagdocker build -t -f Dockerfile.test my-docker-image:v1.0 .
Use docker compose to spin up multiple containers
Docker-compose specification is a developer-focused standard for defining cloud and platform agnostic container-based applications. Instead of running contianers directly form a command line using docker CLI consider creating a docker-compose.yaml describing all the containers that comprise your application.
[!INFO] Please note that applications described with docker compose specification is fully portable, so you can run it locally or in Azure Container Instances
Use Kompose to convert docker-compose files to Kubernetes manifests
Using docker compose allows for quick conversion between docker-compose.yaml file to native Kubernetes manifest files.
[!INFO] You can download Kompose binaries from the home page
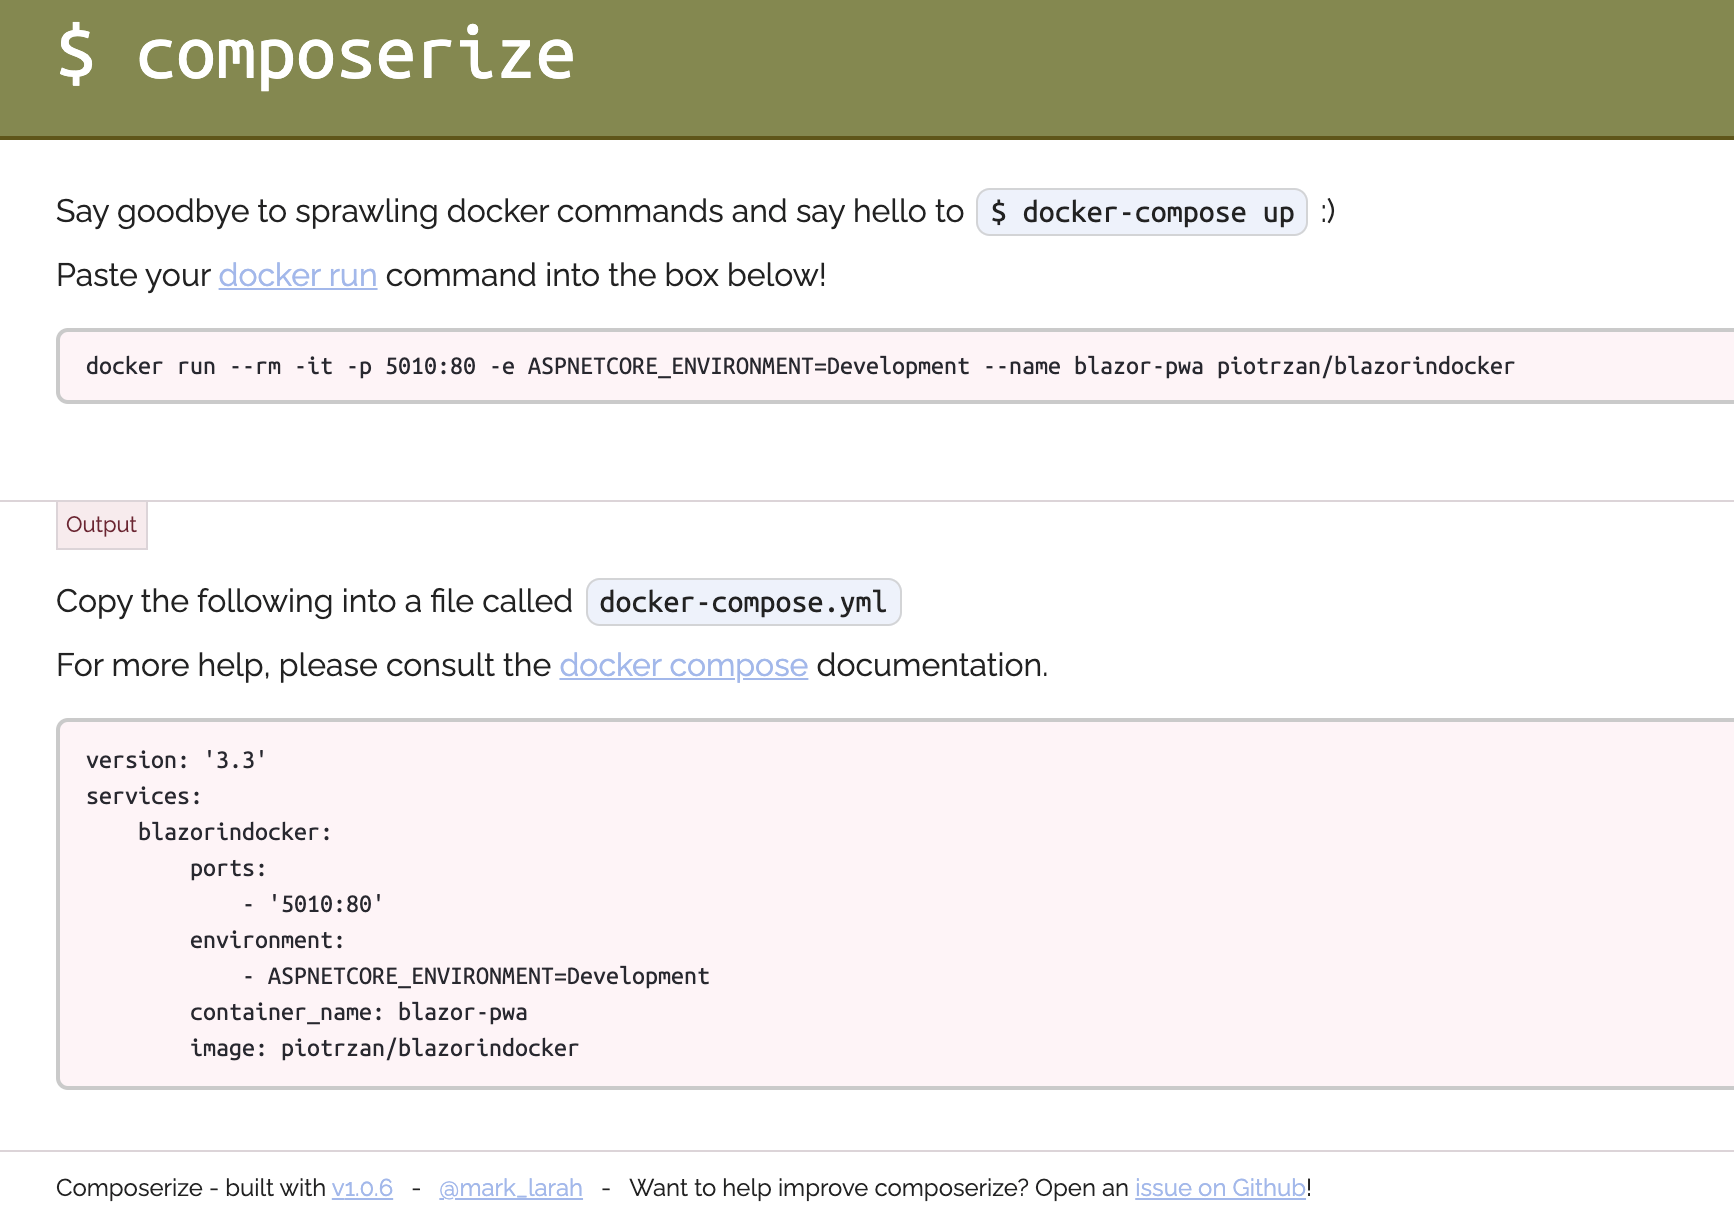
Use composerize to quickly create docker-compose files from docker run commands
Docker run commands can quickly represent imperative style of interacting with containers. Docker compose file on the other hand is a proffered, declarative style.
Composerize is a neat little tool that can quickly turn a lengthy docker run command into a docker-compose.yaml file.
[!TIP] composerize can generate docker-compose files either from CLI or a web based interface.
Here is an example of convering a docker run command form one of my images:
Control resources utilization by a container
CPU
Default CPU share per container is 1024
Option 1: If host has multiple CPUs, it is possible to assign each container a specific CPU.
Option 2: If host has multiple CPUs, it is possible to restrict how many CPUs can given container use.
It's worth noting that container orchestrators (like Kubernetes) provide declarative methods to restrict resources usage per run-time unit (pod in case of Kubernetes).
Memory
Option 1:
Run container with --memory=limit flag to restrict use of memory.
If a container tries to consume more memory than its limit, system will kill it exiting the process with Out Of Memory Exception (OOM). By default container will be allowed to consume same amount of SWAP space as the memory limit, effectively doubling the memory limit. Providing of course that SWAP space is not disabled on the host.
Map only ports you want to open
Ports mapping always goes from HOST to CONTAINER, so -p 8080:80 would be mapping of port 8080 on host to port 80 on container.
[!TIP] Hint: Prefer using "-p" option with static port when running containers in production.
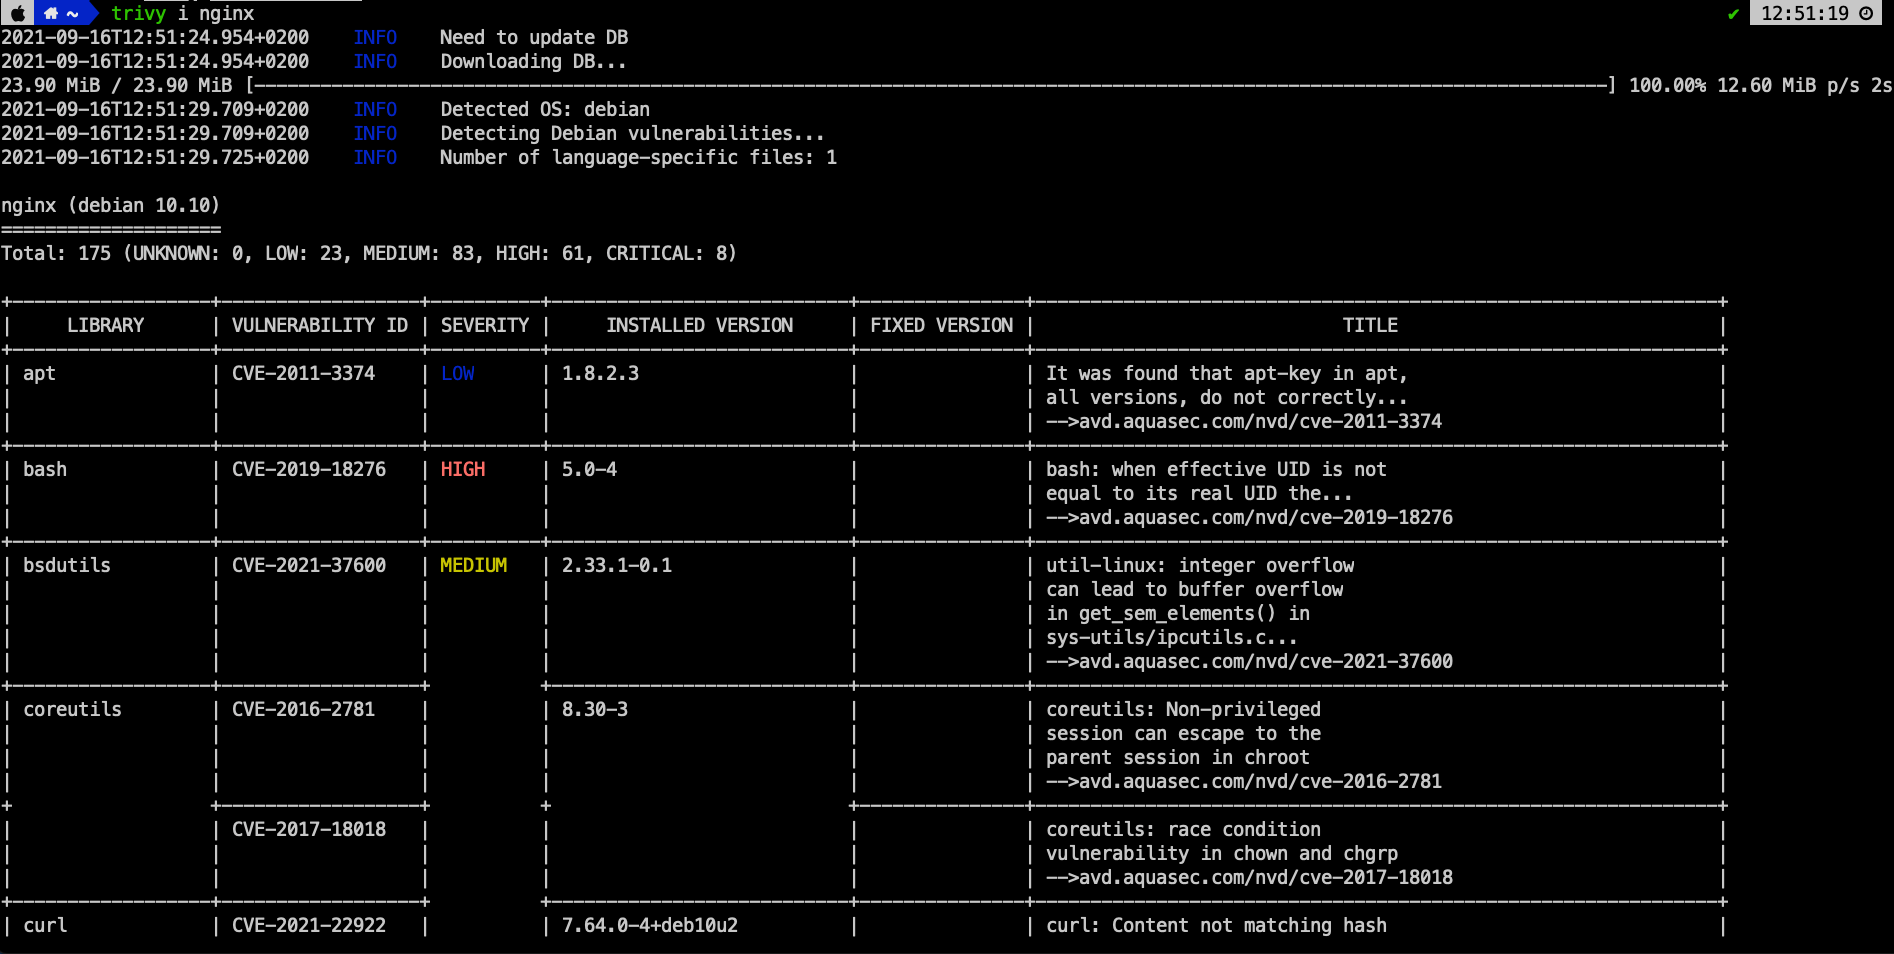
Use trivy to scan for image vulnerabilities
When using open source images, it is critical to scan for security vulnerabilities. Fortunately there are a lot of commercial as well as open source tools to help with this task.
[!INFO] trivy from Aquasecurity:
Using trivy is trivial ;) trivy image nginx reveals list of vulnerabilities with links to CVEs
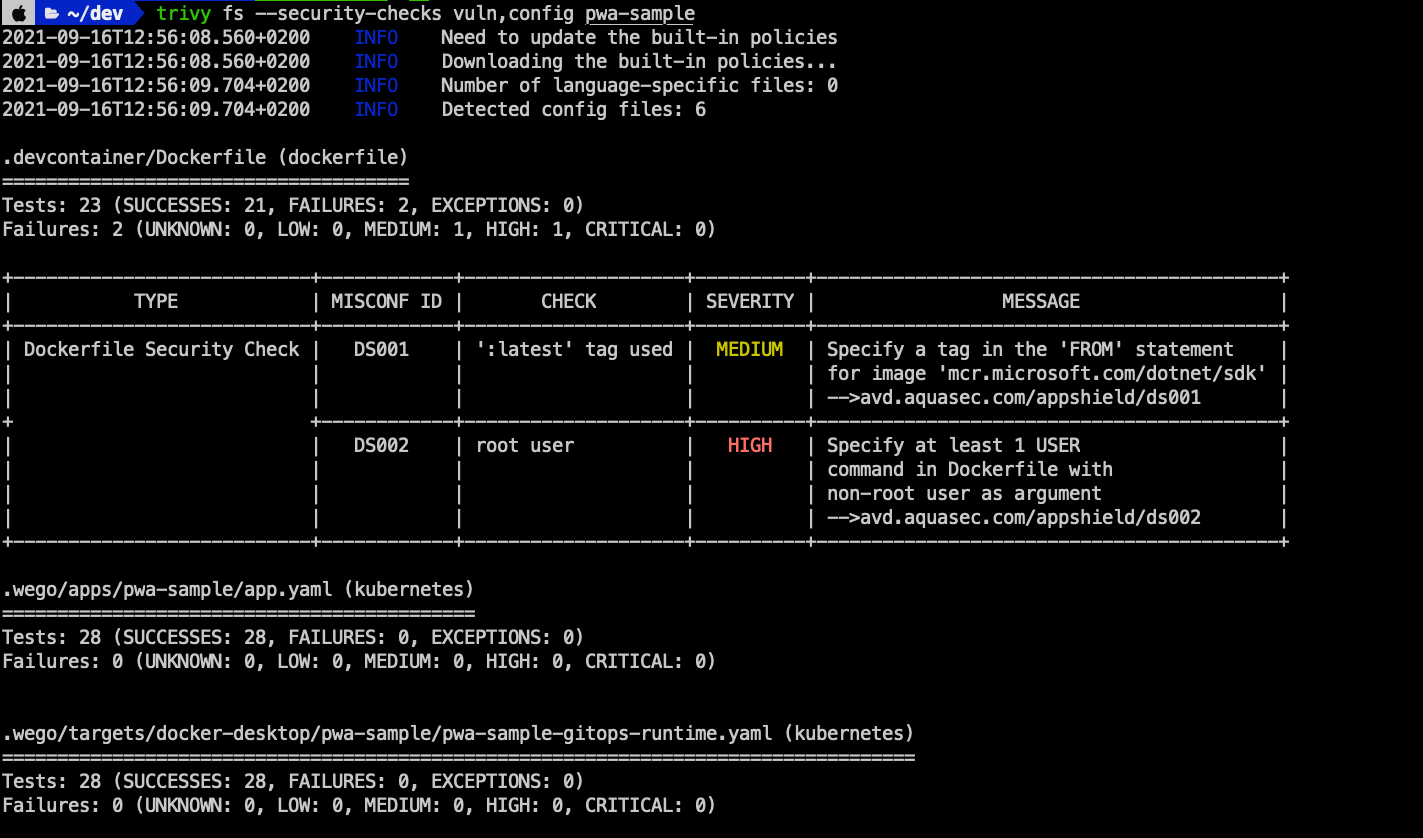
Additionally to scanning images trivy can also search for misconfigurations and vulnerabilities in Dockerfiles and other configuration.
Here is a result of trivy scan over a sample project:
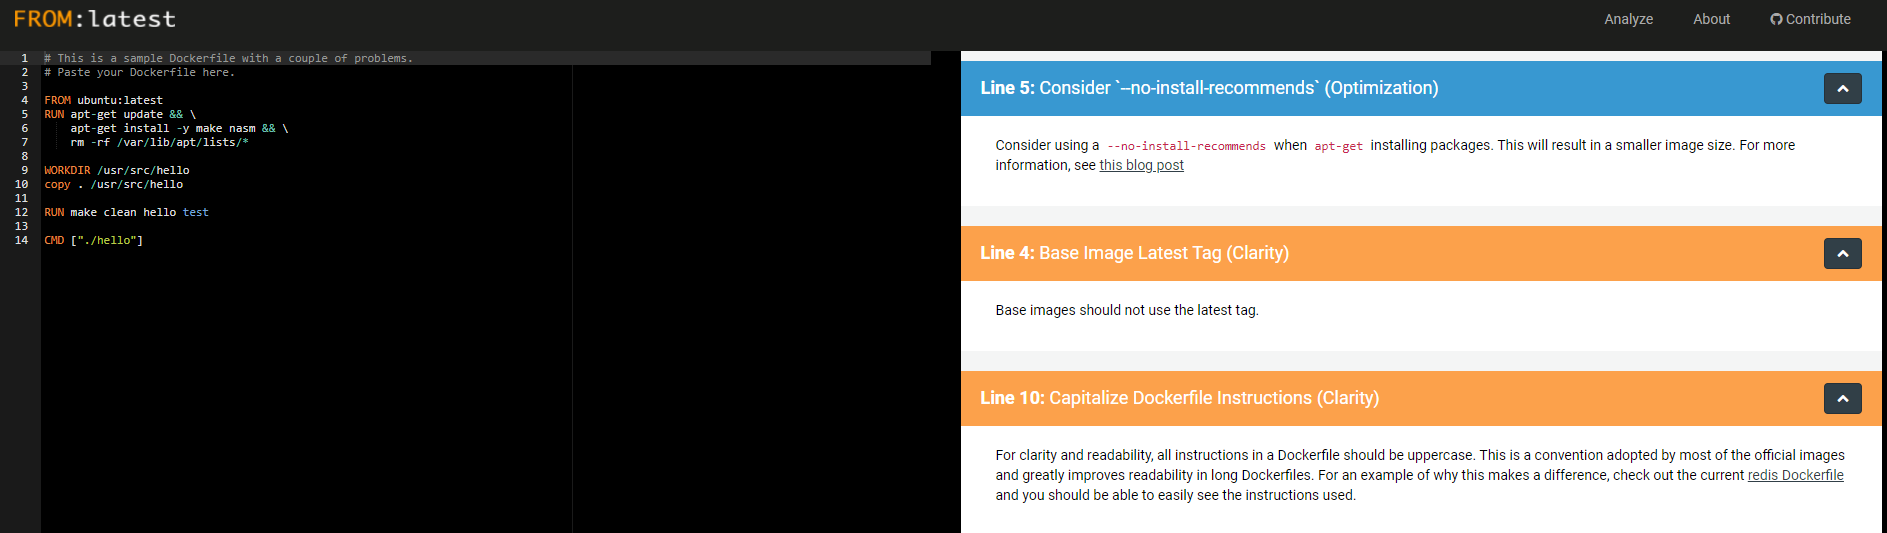
Use linters on Dockerfile
As part of your development process, ensure good linting rules for your Dockerfiles.
A good example is a simple tool called FROM:Latest developed by Replicated.
Below screenshot of the tool with recommendations:
[!TIP] Consider installing linting plugins to your editor of choice as well as run linting as part of your CI process.
Use dive to inspect images
Docker and similar tools provide an option for inspecting an image.
docker inspect [image name] --format - this command will display information about the image in json format.
[!TIP] if you are using bash/zsh/fish you can pipe the output of the command to
jqand query the result. For example, if you have and nginx image, you could easily query for environment variables like sodocker inspect nginx | jq '.[].ContainerConfig.Env[]'
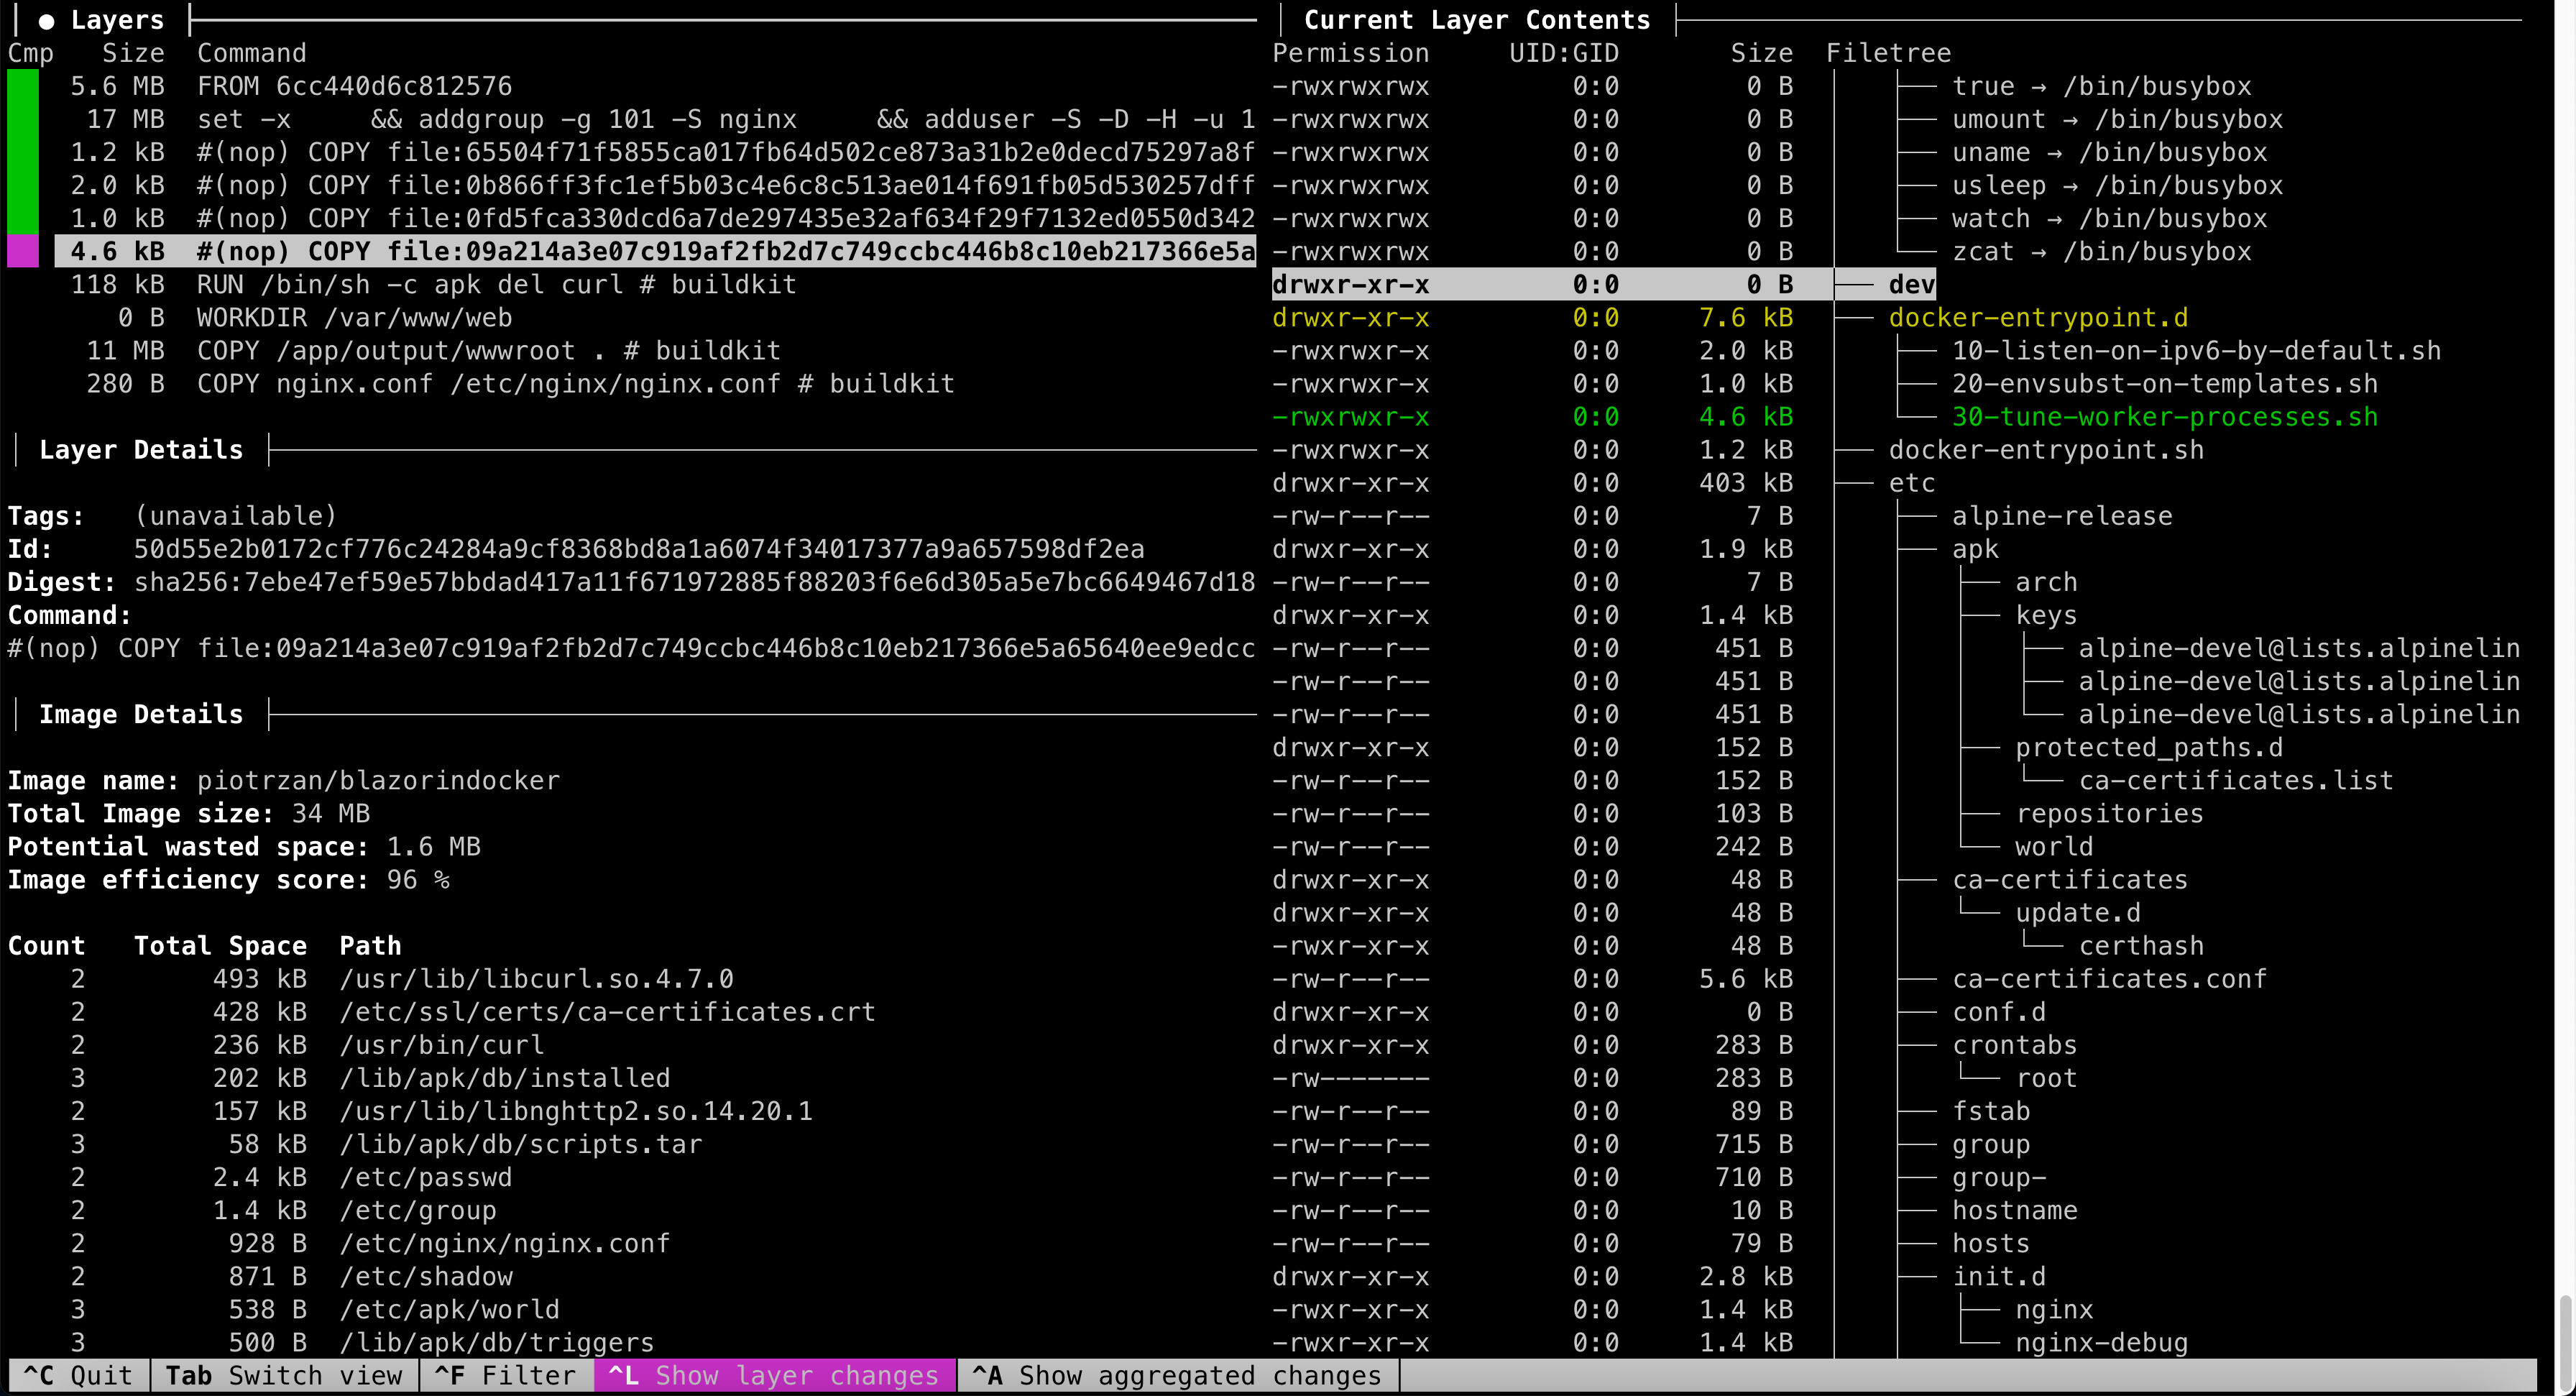
This information however is rather rudimentary. To inspect the image even deeper, use dive
Follow the installation instructions for your system. Dive shows details of image content and commands used to create layers.
Decomposing an image
If you cannot install tools like dive, it is possible to decompose a contianer image using this simple method.
Container images are just tar files containing other files as layers.
Here is how to extract save nginx image and inspect its content:
 docker save nginx > nginx_image.tar
 mkdir nginx_image
 cd nginx_image
 tar -xvf ../nginx_image.tar
 tree -C
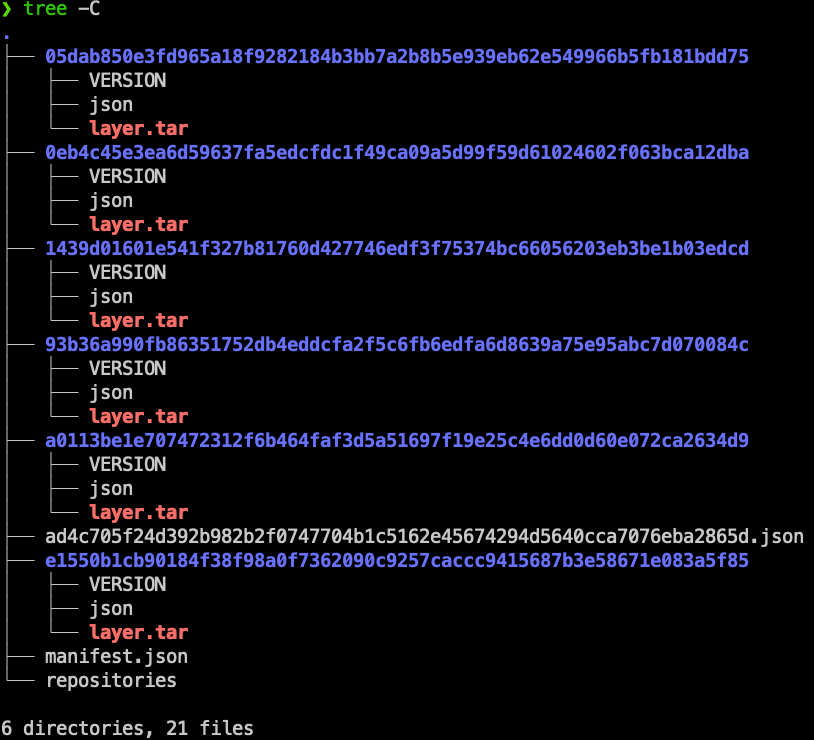
Each layer corresponds to a command in Dockerfile. Extracting a layer.tar file will reveal files and settings of this layer.
Consider signing and verifying images
Supply chain attacks has recently increased in frequency. Trusted and verifiable source code and traceable software bill of materials are critical to security and integrity of the whole ecosystem.
You can sign your own images using tools from the SigStore project
[!INFO] Sigstore is part of Linux Foundation and defines itself as "A new standard for signing, verifying and protecting software".
There are many tools under SigStore's umbrella, but we are interested in Cosign. Follow the installation steps from the Cosign repo.
Here is how to sign your own image and push to Docker hub:
cosign generate-key-pair #this will generate 2 files, one with private and one with public key
cosign sign -key cosign.key <dockeruser/image:tag>
Build & Ship
Shipping containerized software has become easier and more streamlined due to standardized packaging (image) and runtime (container).CI/CD and systems automation tooling benefits from this greatly.
Nowadays pipelines follow the “X-As Code” movement and are expressed as YAML files and hosted alongside source code files in a git repository. The exact syntax of those YAML files will vary from provider to provider. Azure DevOps, GitHub, GitLab, etc will have their variations. Nevertheless, there are a few key components. Here is a sample YAML pipeline file for Azure DevOps with the most important definitions:
- Resources: additional resources that pipeline needs to function. Can be other pipelines, image repositories, etc
- Trigger: How the pipeline is triggered, can be only for a specific branch, pull request and more
- Paths: for the trigger branch/PR what is the path where the source code is to work with
- Variables: For convenience, most pipeline runners will provide a way to inject variables into a pipeline
- Pool: VM or container running the pipeline jobs
- Stages: Sequential stages of the pipeline, stages are logical grouping of jobs
- Jobs: Another grouping level inside of stage
- Task: actual activity carried out on the artefact/source code
There is much more to CI/CD pipelines in general, the emphasis here is on actually incorporating a pipeline from the start with your project.
Build images using Kaniko or Buildah
To increase security consider building images in pipelines using Kaniko or Buildah instead of Docker.
Both tools do not depend on a Docker daemon and executes each command within a Dockerfile completely in userspace. This enables building container images in environments that can't easily or securely run a Docker daemon, such as a standard Kubernetes cluster. Whereas Kaniko is more oriented towards building images in Kubernetes cluster, Buildah works well with only docker images.
Implement image scanning
Image scanning refers to the process of analyzing the contents and the build process of a container image in order to detect security issues, vulnerabilities or bad practices.
[!TIP] Recommendation: there are three major image scanning tools currently available
- Snyk
- Sysdig
- Aqua My recommendation is to use Snyk, for more detailed comparison check out this blog
Integrate image scanning with CI/CD
Follow those best practices when integrating image scanning with your CI/CD pipelines:
- Scan images from the build pipeline (CI)
- Scan images in repositories, before containers are created out of them (CI)
- Scan running containers (CD)
- Always pin image version explicitly (DO NOT use "latest" or "staging" tags)
[!TIP] For detailed explanation on how to integrate image scanning using Synk with Azure Pipelines, please refer to Snyk documentation
Operations
Installation
Installing docker engine on Linux distro is pretty straight forward. Please follow installation steps from Docker documentation.
Installing docker engine on WIndows Server is a bit more diffifult, follow this tutorial to install and configure all prerequisites.
[!INFO] By default only windows containers will run on Windows Server. Linux containers must be additionally switched on (part of the documentation above)
Use Portainer to monitor docker
Once docker host is installed you can use Portainer to interact with monitor and troubleshoot.
Choose installation option depending on the environment you are in.
 Sample Portainer dashboard
[!INFO] Once installed, docker creates a folder under
/var/lib/docker/where all the containers, images, volumes and configurations are stored. Kubernetes and Docker Swarm store cluster state and related information in etcd. etcd by default listens on port2380for client connections.
Use watchtower to update images
Since docker host does not provide automated images update, you can use Watchtower to update images automatically when they are pushed to your image registry.
docker run -d \
  --name watchtower \
  -e REPO_USER=username \
  -e REPO_PASS=password \
  -v /var/run/docker.sock:/var/run/docker.sock \
  containrrr/watchtower container_to_watch --debug
Useful Commands
This section describes useful docker CLI commands in following format:
Command: - docker command syntax
When is it useful: - common usecases when command should be used
Result: - what is the expected behavior or
Check Docker Status
Command:
docker system infoWhen is it useful: quickly see how many containers are running and what is the status of host OS
Result: information about docker host environment and containers
Remove all unused docker artifacts
Command:
docker system prune --allCommand Variation:
docker system prune --all --volumesWhen is it useful: when learning or experimenting with docker, it is useful to clear unused artifacts without resetting the whole environment. Command variation with
--volumesflag will also remove volumes.Result: following will be removed:
- all stopped containers
- all networks not used by at least one container
- all images without at least one container associated to them
- all build cache
- volumes (if
--volumesflag is used)
Stop all running containers
Command:
docker container stop $(docker container ls -q)When is it useful: quickly stop all running containers at once.
Result: all containers are stopped.
Setup container hostname
Command:
docker container run -it --name=ingress --hostname=nginx nginxWhen is it useful: default hostname is container id, setting up recognizable hostname can help with logging etc.
Result: container hostname is set to custom one.
Automatically remove a container when on exit
Command:
docker container run -d --name=ingress --rm nginxWhen is it useful: run a container and automatically remove it once stopped. This is very usefully when running CI/CD containers.
Result: container starts and is removed once it's stopped.
Filter results using --filter flag
Command:
docker search --filter=stars=3 --no-trunc busyboxWhen is it useful: Results of almost every docker command can be filtered using
--filter key=valueflag. Refer to docker documentation to check what filter options are supported for given command.Result: command output filtered as per filter flag.